Info TESTING AND SHOOTING TIPS

Status
Not open for further replies.

Marje and Gracie

Very Active Member
Moderator
We all seem to get wrapped around managing FD and the numbers and foods, etc. When new members join, we may overlook some of the tips we've come to employ for testing and shooting. We assume that by the time a member has gotten to Lantus Land, they are home testing since they should be starting off in Health. But, even in Health, sometimes the little tips are not conveyed due simply to the amount of info being dumped quickly on a new member. An important resource for new and existing members is Hometesting Links and Tips.

Testing
We all know the basics:
  • Warm the ear with a rice sock or a warm washcloth wrapped in a plastic bag.
  • Either freehand or use a lancing device; new members usually start with a larger gauge lancet such as 28g or 29g until the ear learns to bleed; then progress to a 31g or 33g which are finer.
  • Be sure to poke in the "sweet spot" and not the major vein that runs along the length of the ear. Poking the vein will not only hurt, but will result in a lot of blood. The sweet spot is on the edge of the ear.
4395C545-36BF-4ABA-BEC7-4392FCDB191C.jpeg

But did you also know there is a particular way for the lancet to be used? It has one side that is bevelled so the sharpest part goes in first, if used correctly. In the photo below, you can see the lancet is angled. When you poke the ear, it should be held in the position shown below so the longest side of it is on the bottom. Lancets should only be used once to ensure they are at their sharpest.
2417E86C-BAE9-43B4-8612-C49C88D2C0AC.jpeg


Ear Care
Since our kitties must endure so many tests, what are some ways to take care of the ears?
  • Hold a wet, cool baby washcloth on the poke site immediately after the test to prevent bruising.
  • Put Emla cream on the test sites after each test. It only takes a tiny dab and you can wipe it off before the next test. Emla cream requires a prescription from your vet. Neosporin with has been found to contain a toxin to cats, polymixin, and should be avoided.
  • You can purchase Ledum 30C homeopathic remedy at any health food store. Dissolve one tablet in a small bottle of pure water and then apply one or two drops to each ear every day. Ledum is great for puncture wounds.
How to Hometest a Fractious Cat (Video from Bonnie and Junior)

Shooting
We all have our own techniques for shooting but just a few thoughts and others may bring some of their ideas in as well.
  • Injection sites:
You can shoot the scruff, side of chest, side of belly, side of flank....wherever your kitty is comfortable and you have the least chance of doing a fur shot.

12715861-6481-417B-B0E4-EE494D3426B2.jpeg

  • Site Rotation
It's actually a great idea to rotate sites in order to prevent development of a lipoma or scar tissue. A lipoma is just a thickened area of fatty cells right under the skin. If you shoot in the same place repeatedly and your kitty develops one, they often will go away on their own if you switch to another site. However, if you change injection sites every day (if possible), there is a much decreased chance in developing either a lipoma or scar tissue. Both of these can affect absorption negatively. If your cat prefers scruff shots only, you can shoot one side in the morning and the other side at night; you can also move the scruff site so the first day, you shoot at the inner scruff on one side, the next day, the middle scruff, and the third day, the outer part of the scruff. Or, if kitty is tolerant of any injection sites, you can shoot one side in the mornings and shoot the scruff the first day, the chest the next, the flank the third day. In the evenings, you can shoot the other side of the kitty but in the same order.
  • Absorption Rates
Theoretically, shots absorb slower when given in the scruff area as opposed to the chest, belly, or flank. This does not mean the BG numbers will be different. It just affects the absorption rate....faster or slower. But, ECID and you can keep track of where you shoot and see if the absorption rates vary for your kitty depending on shot site.
  • Method of Shooting
Some members choose to "tent" the skin to shoot. They raise the fur to form a "tent" and then shoot into the base of the tent. Another technique, which might help more in decreasing fur shots, is the "roll" method. In this method, you lift the fur and skin with your non-shooting hand, and then roll your hand back so the back of your hand faces the kitty's head. This opens up a nice bit of skin that you can clearly see. It's important that you lift and then roll so you are guaranteed of shooting into the subcutaneous layer. The photo below illustrates how well you can see the skin when you lift and roll so that you know you are not shooting into fur as you might with the tent method.

3D690BE9-80E2-48AD-B4A5-3C77CDB55350.jpeg

  • Ready, Set, Shoot!
When you are ready to inject, be sure the syringe is parallel to the spine (edited to add) at a 45 degree angle and the bevel is up so the sharpest point slides in first. The photo below shows the bevel up. Never use an insulin syringe more than once as the needle quickly degrades, loses it's sharpness, and multiple use poses the risk of contamination and infection.
FDF66A97-8F7A-4ECE-8D41-6B69103CEA6D.jpeg


How to Give an Injection (Video from Julie & Punkin)


Hopefully these ideas will facilitate the testing/shooting process for you especially if you are new to FD.
 
Last edited:
Re: 12/15 TODAY'S LESSON -- TESTING AND SHOOTING TIPS

I use the Neosporin Cream with Pain Relief. Is that bad?
 
Re: 12/15 TODAY'S LESSON -- TESTING AND SHOOTING TIPS

It isn't bad at all, Dyana. I think several members have found that it gunks up the ear more and makes it harder to get a good blood sample the next test. If it works for you, I wouldn't worry.
 
Re: 12/15 TODAY'S LESSON -- TESTING AND SHOOTING TIPS

Thanks for writing up another bookmarkable topic Marje! And please thank Gracie for being the model. The pics are great.

For warming the ears, I've lately switched to warm water in an old plastic camera film canister. That's probably similar to using the pill bottle but I know it's seals easily.

For those in Canada, Neosporin is called Polysporin.
 
Re: 12/15 TODAY'S LESSON -- TESTING AND SHOOTING TIPS

Marje, you ROCK!

I didn't test Bob often enough, and it was only 10 weeks of juice, but it has been a year and a half of tests... and I never realized the lancets were beveled! Even with bifocals :lol:

Thanks for another helpful "Today's Lesson",

Carl
 
Re: 12/15 TODAY'S LESSON -- TESTING AND SHOOTING TIPS

Thank you very much for this. It's so nice to have all the information together to bookmark. Thanks for taking your time to put this together for us. I'm with Carl on the lancets and the bifocals. :lol: Will have to get out the magnifying glass :oops:
mary and oliver
 
Re: 12/15 TODAY'S LESSON -- TESTING AND SHOOTING TIPS

Great info Marje! I have 2 questions about poking w/ the lancette. 1. What angle to the ear do you poke? I have been poking on about a 60 degree angle to the skin (90 deg would be straight in). 2. If not 90 deg, which direction do you point towards? Examples being toward head, toward tip of ear, toward side of ear, toward outside. And then, like injecting, I assume bevel up. Mark & Oliver
 
Re: 12/15 TODAY'S LESSON -- TESTING AND SHOOTING TIPS

I use a 45 degree angle, and poke towards the base of the ear. I freehand the lancet too.

Carl
 
Re: 12/15 TODAY'S LESSON -- TESTING AND SHOOTING TIPS

Excellent, Marje, and great photos as well. You and Mike are a great team!

Suze
 
Re: 12/15 TODAY'S LESSON -- TESTING AND SHOOTING TIPS

I have a question - when you say the syringe should be parallel to the spine, what exactly do you mean? I read once to inject downward at a 45 degree angle into the tent (which is what I've been doing). Do you mean the syringe shouldn't be angled downward or that the syringe should be aligned with the spine?
 
Re: 12/15 TODAY'S LESSON -- TESTING AND SHOOTING TIPS

Thank you so much for putting this together Marje. You and Mike did a fabulous job on this.

Jo
 
Re: 12/15 TODAY'S LESSON -- TESTING AND SHOOTING TIPS

Nice post, Marje! Lately I've been getting really sucky at the ear pokes. I had no idea the lancet was bevelled. I will try to get that fixed up so poor Bu doesn't have to get stabbed so many times. I used to be pretty good at that....
 
Re: 12/15 TODAY'S LESSON -- TESTING AND SHOOTING TIPS

Thank you all.

Just to answer a few questions:

ecurie said:
1. What angle to the ear do you poke? I have been poking on about a 60 degree angle to the skin (90 deg would be straight in). 2. If not 90 deg, which direction do you point towards? Examples being toward head, toward tip of ear, toward side of ear, toward outside. And then, like injecting, I assume bevel up. Mark & Oliver

Thanks, Mark, for these questions. I think it depends on the cat and the caregiver....we all have different techniques. I freehand and so I don't know about the angle with the lancing device; however, when I freehand, I'm usually at a 45 degree angle or less. I usually catch the very edge of Gracie's ear and it doesn't take alot of angle. Also, direction is up to the CG's style. There are some that even poke the inside of the ear on the edge. I know Ann (Tess) puts a little twist on the lancet as she pokes. So there is some degree of individuality there. I wouldn't poke straight down and even a 60 degree angle seems a bit much.

Nancy&Pepper said:
when you say the syringe should be parallel to the spine, what exactly do you mean? I read once to inject downward at a 45 degree angle into the tent (which is what I've been doing). Do you mean the syringe shouldn't be angled downward or that the syringe should be aligned with the spine?

Also, a great question, Nancy. And important enough that I did go back and edit the post. The syringe should be aligned with the spine and go in at about a 45 degree angle. What you don't want to do is shoot perpendicular with the syringe perpendicular to the spine. In the photo, I have the correct alignment although because of the angle of the way Mike took the photo, you can't tell the angle of the syringe but I always do about a 45 degree angle.

I hope that helps! Please let me know if anything else needs some clarification or if you have any other pointers to add.
 
Re: 12/15 TODAY'S LESSON -- TESTING AND SHOOTING TIPS

I tried your 'roll' method tonight, Marje. I like that it's easier to see skin. Checkers' hair is very thick on the scruff, and he won't allow me to shoot anywhere else on his body.
 
Re: 12/15 TODAY'S LESSON -- TESTING AND SHOOTING TIPS

Marje, thank you for this info. I, too, did not realize the lancet was beveled and lately I haven't been paying attention to the bevel of the syringe either. I'm going to try your roll method tomorrow. It looks like it will work better. I was free sticking with the lancet and my wife was using the device so I switched to the device also. We do have a problem getting the lancet to stick the ear when held at any angle and sometimes, I'm guessing because of too large and angle, it pierces through the ear. I'm going to go back to the free sticking method.

Thank you for taking the time to do this. I think the remedial training is good for everyone to keep our skills honed.

Have a great night.
 
Re: 12/15 TODAY'S LESSON -- TESTING AND SHOOTING TIPS

Thanks Marje & Mike for the tips.
I massage Rosy's scuff area a bit before the injection. She's more relaxed, prepared & let me do it easily. When I inject, I use the syringe body to push in, instad of the plunger top to avoid any spill before the needle is in.( oh yes, this has happened b4, clumsy mum bean!) After the injection, I hold to a count of 10 (extra cautious mum bean again!) before pulling the needle out, just to make sure every drop of insulin is injected.
 
Re: 12/15 TODAY'S LESSON -- TESTING AND SHOOTING TIPS

I also freehand the lancets and highly recommend this as you have much more control, and your cat won't be irritated/shocked by the "pop" of the device.

My Pumbaa is very in tune to signs that it is "testing time", and I have tried to remove all of these signals from our daily life. One used to be me putting in the test strip ahead of time, to test it out, and having the meter beep. Our new meter, the Relion Prime, not only has much more affordable test strips (50 for $9.00), but there is NO sound. The no sound has been a huge bonus to the cheaper test strip price.

During testing, I do have the bevel facing in the correct direction, and always go for the outside portion of the ear, on about a 10 degree angle. Yes, I've found that Pumbaa reacts less the more parallel to his ear flesh I am with the lancet.

For injecting, I am going to try the rolling instead of tenting for Pumbaa, because Pumbaa sometimes hates when I tent his skin. Now that he's more muscular and doesn't have a whole lot of excess skin like he did before. I don't know if this will work better, but it's worth trying!

And if you are using Terumo syringes, you already know that you can't even think about touching the plunger before it's time to plunge. They are that sensitive. *LOL*

Also, if you are having problems giving fur shots, please think about getting Wahl hair trimmers, and buzzing the fur off of your cat in the injection areas. I've been doing this for Pumbaa for many months now, and it makes it SO much easier to see what I am doing! The fur grows back quickly, so I have to buzz him about once a month. But it's well worth it!

Good luck to you all! And thank you to Marje/Mike again, for a great informative thread!

Suze
 
Re: 12/15 TODAY'S LESSON -- TESTING AND SHOOTING TIPS

Thank you Carl & Marje for posting answers to my questions. I am watching the bevel now and am poking at a shallower angle to the skin. I tried the "sweet spot" again but just don't get enough blood even with a 28 ga lancet. So I have gone back to poking about center (top to bottom) and 2-3mm from the outer edge while putting pressure on the vein at the base of the ear with my index finger. This method makes the poke go toward the ear tip. That is all with my right hand while I have to hold the tip of Oliver's ear with my left hand or he will wiggle it away. His recent trick is reaching around and biting my left hand after the poke. Then I have to grab the tip of his ear again so Mary can maneuver the meter/strip into place. Even at 2 weeks old we knew Oliver would be the bitey one. This whole process normally takes 4 hands and 2 body blocks but, occasionally, Mary can sneak a test in without Ollie realizing we don't have 9 players on the field.

Mark & Oliver
 
Re: 12/15 TODAY'S LESSON -- TESTING AND SHOOTING TIPS

Mark,
One thing you can try is to see if you can get the drop of blood onto a fingernail, and then you can let Oliver loose, and sip the blood onto the strip off of your fingernail. When Bob got squirmy after two or three pokes, that's what I did. It also might save you some strips. I used to put the strip in the meter, and then felt like I was racing against the clock, trying to get blood before the meter timed out. So I started just putting the strip part way in, getting the drop on my nail, letting the cat go, and then I could push the strip all the way into the meter, and take my time. Less stress for me, and for Bob.

Carl
 
Re: 12/15 TODAY'S LESSON -- TESTING AND SHOOTING TIPS

SO HELPFUL!! ohmygod_smile
Learning about the bevel and switching to a 26 gauge lancet seems to be the trick for getting a good sample on the first poke! I was even able to get a great blood bead off my civie cat, on his first and only test.
(oh man, I really hope I didnt just jinx my recent success!!)
 
Re: 12/15 TODAY'S LESSON -- TESTING AND SHOOTING TIPS

Thanks, Marje, for taking the time to write this up and post it! :thumbup Count me as another one who had no idea about the lancets being beveled. I've been using an Accu-Check FastClix since the beginning because I didn't know about poking free-hand when I first started. I'm going to soon run out of the FastClix refills and they're expensive, so I was planning on switching to free-hand (plus, my diabetic aunt gave me a TON of free lancets). This is great knowledge to have.

Might I suggest Vetericyn as another option instead of Neosporin? I initially tried the Neosporin on Michelangelo and he HATED it and would constantly rub at his ears and try cleaning it off his ears. cat(2)_steam My neighborhood pet store suggested the Vetericyn instead since it's non-toxic and it's worked quite well for us.

Here are a few other things that I encountered when I was first starting out if you want to include any of them as well.
 
Re: 12/15 TODAY'S LESSON -- TESTING AND SHOOTING TIPS

Hi everyone,

I just wanted to bump this up - because I think there are a lot of brilliant tips in here. I wasn't able to take so much in the first time (too much to learn in one go). If you're having testing troubles, like I have been, maybe it could help to look over it again.

Thanks for all the great tips!!!

Grace
 
if you are using a lancet device, as I did, it helps to use the clear lid. if you're having trouble getting blood to well up, it helps to hold the device firmly against the ear for about 5 seconds before you click it. then hold for another 5 seconds as the blood wells up before you remove the device.

there is no angle with the device. You go straight against the skin. however, the lancet's sharpest point is also the longest point, so it goes through the skin first.

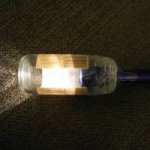
when we started out we fixed this little flashlight/plastic tape/old spice bottle get-up. we put the bottle against punkin's ear so we had a hard surface to work against, and the flashlight really helped us see the capillaries. the plastic tape held it all together. we unscrewed the battery at the end to turn it off.
 

Attachments

  • phpG3gLKI_c1PM.jpg
    phpG3gLKI_c1PM.jpg
    7.3 KB · Views: 4,341
Marge,
Great job and great Pics!
I bookmarked the info.
Thanks again Paula & kitty Michael
 
Hi!
I'm only a week in with home testing, but me and Talula are doing pretty good with it! I just joined the message board today with a post to the welcome board. Meanwhile I've been reading as many other posts as I can, trying to learn.

I have a question when you say you freehand the lancet. Do you put it in the device at all or just hold it between your fingers? I'm assuming from the picture you just hold it. I ask because my device (Relion Confirm) has a depth adjuster. I've been using the deepest one but have a hard time telling where it's going to land since I can't actually see the lancet.

Can I use the lancing device and hold it at the angle you suggested and still click it without having the depth adjustment cap on? If I freehand it do I just need to get a feel for how deep and how quick to poke?

Thanks so much!
Sara and Talula

From the
We all seem to get wrapped around managing FD and the numbers and foods, etc. When new members join, we may overlook some of the tips we've come to employ for testing and shooting. We assume that by the time a member has gotten to Lantus Land, they are home testing since they should be starting off in Health. But, even in Health, sometimes the little tips are not conveyed due simply to the amount of info being dumped quickly on a new member.

Testing
We all know the basics:
  • Warm the ear with a rice sock or a warm washcloth wrapped in a plastic bag.
  • Either freehand or use a lancing device; new members usually start with a larger gauge lancet such as 28g or 29g until the ear learns to bleed; then progress to a 31g or 33g which are finer.
  • Be sure to poke in the "sweet spot" and not the major vein that runs along the length of the ear. Poking the vein will not only hurt, but will result in a lot of blood. The sweet spot is on the edge of the ear.
earpokey_zpsc6584fc3.jpg


But did you also know there is a particular way for the lancet to be used? It has one side that is bevelled so the sharpest part goes in first, if used correctly. In the photo below, you can see the lancet is angled. When you poke the ear, it should be held in the position shown below so the longest side of it is on the bottom. Lancets should only be used once to ensure they are at their sharpest.
IMG_0555_zps452342a5.jpg


Ear Care
Since our kitties must endure so many tests, what are some ways to take care of the ears?
  • Hold a wet, cool baby washcloth on the poke site immediately after the test to prevent bruising.
  • Put Neosporin Ointment (not cream) with Pain Relief on the test sites after each test. It only takes a tiny dab and you can wipe it off before the next test.
  • You can purchase Ledum 30C homeopathic remedy at any health food store. Dissolve one tablet in a small bottle of pure water and then apply one or two drops to each ear every day. Ledum is great for puncture wounds.
Shooting
We all have our own techniques for shooting but just a few thoughts and others may bring some of their ideas in as well.

  • Injection sites:
You can shoot the scruff, side of chest, side of belly, side of flank....wherever your kitty is comfortable and you have the least chance of doing a fur shot.
resourceaspx_zps001fb4ad.jpeg


  • Site Rotation
It's actually a great idea to rotate sites in order to prevent development of a lipoma or scar tissue. A lipoma is just a thickened area of fatty cells right under the skin. If you shoot in the same place repeatedly and your kitty develops one, they often will go away on their own if you switch to another site. However, if you change injection sites every day (if possible), there is a much decreased chance in developing either a lipoma or scar tissue. Both of these can affect absorption negatively. If your cat prefers scruff shots only, you can shoot one side in the morning and the other side at night; you can also move the scruff site so the first day, you shoot at the inner scruff on one side, the next day, the middle scruff, and the third day, the outer part of the scruff. Or, if kitty is tolerant of any injection sites, you can shoot one side in the mornings and shoot the scruff the first day, the chest the next, the flank the third day. In the evenings, you can shoot the other side of the kitty but in the same order.

  • Absorption Rates
Theoretically, shots absorb slower when given in the scruff area as opposed to the chest, belly, or flank. This does not mean the BG numbers will be different. It just affects the absorption rate....faster or slower. But, ECID and you can keep track of where you shoot and see if the absorption rates vary for your kitty depending on shot site.

  • Method of Shooting
Some members choose to "tent" the skin to shoot. They raise the fur to form a "tent" and then shoot into the base of the tent. Another technique, which might help more in decreasing fur shots, is the "roll" method. In this method, you lift the fur and skin with your non-shooting hand, and then roll your hand back so the back of your hand faces the kitty's head. This opens up a nice bit of skin that you can clearly see. It's important that you lift and then roll so you are guaranteed of shooting into the subcutaneous layer. The photo below illustrates how well you can see the skin when you lift and roll so that you know you are not shooting into fur as you might with the tent method.
IMG_0557_zpsa2f4b6d2.jpg


  • Ready, Set, Shoot!
When you are ready to inject, be sure the syringe is parallel to the spine (edited to add) at a 45 degree angle and the bevel is up so the sharpest point slides in first. The photo below shows the bevel up. Never use an insulin syringe more than once as the needle quickly degrades, loses it's sharpness, and multiple use poses the risk of contamination and infection.
IMG_0554_zpsc1e6f357.jpg


Hopefully these ideas will facilitate the testing/shooting process for you especially if you are new to FD.
 
I just freehand it....don't use the device at all. It makes it easier for me to control where it goes.

Just hold the lancet and prick the edge of the ear at about a 45 degree angle

Some people will still put the lancet into the device but not "load" it....just gives them something larger to hold on to
 
It takes about 2 weeks for more capillaries to grow and for you to get blood with every poke. In the beginning, I used the lancet set on the deepest setting and poked all the way through punkin's ears sometimes and still didn't always get blood. Just hang in there through the beginning and everything thing about this gets infinitely easier.
 
@saraj I've always just freehanded without the lancet because I have more control and because Gracie never liked the click of the device or the device near her ears. With free handing, she's always been perfect. I always hold it at a 45 degree angle as well and just poke the ear edge. The most important part is to have the bevel of the lancet up as it is the sharpest part.
 
Very nice. Thank you, Marje.

Just a reminder... we have compiled a comprehensive list of links to hometesting help here: Hometesting Links and Tips.

Everyone does things a little differently. What works for one may not work for another. There's more than one way to do most everything.
What's important is finding a method that works for you and your kitty! :D
 
I free hand it as well. I am one of the few if not only one that uses a 25g terumo needle. My vet taught me using a bigger needle which I quickly switched to the very sharp terumo ones.
 
A couple of other ideas worth adding for those who have trouble seeing when shooting or drawing up the insulin dose, some members have found a headlamp (like for biking or hiking) can provide concentrated light right where you need it. It also leaves your hands free. We used one bought from REI, similar to this one: http://www.rei.com/product/866957/petzl-tikka-headlamp

Some people also use visors, which incorporate both magnifying lenses and light. Here's one example of that: http://www.doneganoptical.com/products/optivisor

You can also stack reading glasses from any drugstore on top of each other, ie, wear 2 pair on your nose at the same time. :rolleyes: This is a special kind of fashion statement that looks even better if you have a headlamp on at the same time. :D

This little needle-nipper can save you from having to deal with those giant red sharps containers for disposing of needles. You clip off the needle, then the syringe can go into your regular garbage collection. http://www.adwdiabetes.com/product/bd-safe-clip-needle-storage-device_1246.htm

Edited to add one more tip: This little doo-dad can be used with BD syringes and is a magnifier that fits around the syringe.
.
 
Last edited:
Status
Not open for further replies.
Back
Top