I have the older (blue) lancing device. At least you could see where you were aiming with that one. I eventually abandoned it and started freehanding the pokes - and wished I had done so sooner.
Here are my testing methods and tips. Perhaps they might give you some ideas to add to your own testing technique.
------------------------------------------
- For most meters you can insert a test strip part way without switching it on. Once you've done the poke you can then push the strip the rest of the way into the meter to activate it. (Reduces the likelihood that the meter will time out before you can get the blood sample onto the strip.)
- Fold a sheet of kitchen paper in four lengthwise and cut it up into 1" strips. You will use these to cushion and support the ear during the test.
- Apply a thin film of Vaseline or Neosporin ointment (not the cream!) onto the edge of the ear to help the blood sample bead up instead of wicking into the fur. (Wipe off any excess.)
- To get a blood sample you need to increase the blood flow to the ear, so make sure the ear is really, really, really warm (but not hot) - especially in the early days of testing. (Note: With repeated 'poking', more capillaries form in the test area, so it becomes easier to get samples reliably.)
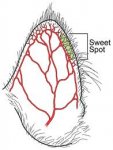
- Once you have the testing area of the ear well warmed, wrap a strip of folded kitchen paper round your index finger then place finger under the sweet spot area of the ear you're testing to support it during the poke.
- Use your thumb and middle finger to lightly but firmly grip the ear and paper strip in place so that the edge of the ear is taut but not overstretched; the little bit of tension will make it easier for the lancet to break the skin surface (and it helps to keep kitty's head from moving around too much).
- When using a lancet 'freehand', make sure the bevelled side of the lancet is facing upwards. Hold the lancet at a slight angle to the ear similar to the way you hold a pen when writing, not perpendicular (easier to see where you're aiming and also makes skin prick easier).
- When it comes to the actual poke, prick the sweet spot on the edge of the ear in a similar way to how you might quickly prick a balloon with the tip of a needle to make it pop. If you aim as close to the edge of the ear as possible you are less likely to hit the marginal ear vein.
- Keep hold of the ear while you're pushing the test strip into the meter to activate it. (Kitties are prone to shake their heads after a poke, sending your precious blood sample flying across the room. Holding the ear reduces likelihood of this happening.)
Note: As you become more practised in testing, you'll be able to activate the meter just before doing the poke and still have plenty of time to collect the sample on the strip before it times out.
- When using the glucometer, bring the test strip to where it j-u-s-t comes into contact with the blood droplet and hold it there. The strip should then 'sip up' the amount it needs to run a valid test. Most meters beep or give a visual cue to let you know that enough blood has been collected on the strip.
If your cat is a wriggler, try collecting the blood sample on the back of your (clean) fingernail and test it from there.
If a test fails and you still have a lot of blood on the strip from the failed test, don't throw it away. Instead, you could pop another strip into the meter and test using the blood on the strip from the first test. (Saves an additional poke so also helpful for wriggly kitties!)
- After the test, fold the paper strip over the edge of the ear and apply gentle pressure to the test area for about 20-30 seconds to minimise bruising.
- Keep giving lots of praise throughout the process and reward with a favourite diabetic-friendly treat or favourite activity (e.g. brushing).

Mogs
.
")
 Will have to work on it.